Showing posts with label Microsoft. Show all posts

Sunday, January 17, 2010

Microsoft Office - Recover deleted items from any folder

Credit: http://office.microsoft.com/en-us/outlook/HA011165281033.aspx

Microsoft Office Outlook® 2003
Microsoft Outlook® 2000 and 2002

This feature requires you to use a Microsoft Exchange Server e-mail account. This feature is designed for advanced users who are comfortable backing up and modifying the Microsoft Windows® Registry.

Outlook provides a way to recover items after you have permanently deleted them, including after emptying the Deleted Items folder. Your Exchange server administrator specifies the retention time for permanently deleted items on the Exchange server. After this time has elapsed, you cannot recover the deleted items.

By default, to use the Recover Deleted Items command on the Tools menu, you must be viewing the Deleted Items folder. By modifying the registry, this command is available regardless of which Outlook folder that you are viewing. You can view and recover deleted items, including those items that were permanently deleted by using SHIFT+DELETE, for the folder that you are viewing.

Note If you deleted an item and emptied the Deleted Items folder, click Deleted Items to use Recovered Deleted Items. Only items that you permanently deleted with SHIFT+DELETE or SHIFT+Button image are available in folders other than Deleted Items.

Caution If you use the registry editor incorrectly, you might cause serious problems that might require you to reinstall your operating system. Microsoft cannot guarantee that you can solve problems that result from using the registry editor incorrectly. Use the registry editor at your own risk.

  1. Exit Outlook.
  2. Open the Windows registry editor.
  3. Browse to My Computer\HKEY_LOCAL_MACHINE\Software\Microsoft\Exchange\Client\Options.
  4. On the Edit menu, point to New, and then click DWORD Value.
  5. Type the name DumpsterAlwaysOn.

    Note Do not type any spaces in the name.

  6. Set the DWORD value to 1.
  7. Restart Outlook.

The Tools menu now has the Recover Deleted Items command for every Outlook folder.

Credit: http://office.microsoft.com/en-us/outlook/HA011165281033.aspx


Nir.


Sunday, December 28, 2008

Sync Gmail with Microsoft Outlook


To set up your Outlook client to work with Gmail:

  1. Enable POP in your email account. Don't forget to click Save Changes when you're done.
  2. Open Outlook.
  3. Click the Tools menu, and select E-mail Accounts...
  4. Click Add a new e-mail account, and click Next.
  5. Choose POP3 as your server type by clicking the radio button, and click Next.
  6. Fill in all necessary fields to include the following information:
    User Information
    Your Name: Enter your name as you would like it to appear in the From: field of outgoing messages.
    Email Address: Enter your full email address (username@gmail.com or username@your_domain.com)

    Server Information
    Google Apps users, enter the server names provided, don't add your domain name in this step.
    Incoming mail server (POP3): pop.gmail.com
    Outgoing mail server (SMTP): smtp.gmail.com

    Login Information
    User Name: Enter your Gmail username (including @gmail.com). Google Apps users, enter your full address in the format username@your_domain.com
    Password: Enter your email password


  7. Click More Settings... and then click the Outgoing Server tab.
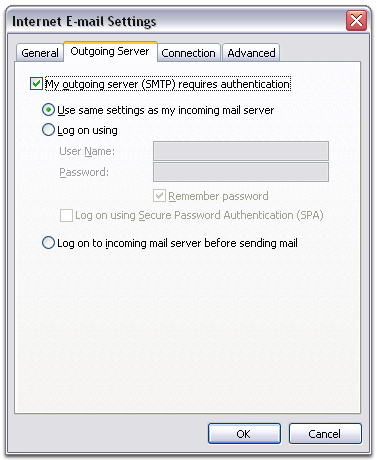
  8. Check the box next to My outgoing server (SMTP) requires authentication and select Use same settings as my incoming mail server.


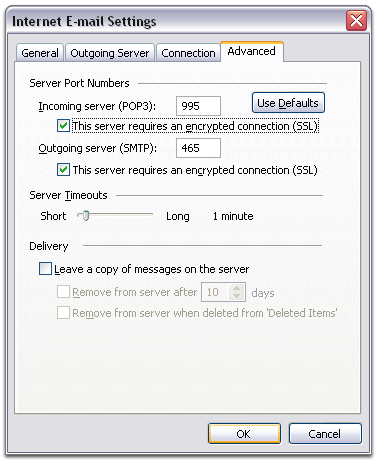
  9. Click the Advanced tab, and check the box next to This server requires an encrypted connection (SSL) under Incoming Server (POP3).


  10. Check the box next to This server requires an encrypted connection (SSL) under Outgoing Server (SMTP), and enter 465 in the Outgoing server (SMTP) box.
  11. Click OK.
  12. Click Test Account Settings... After receiving Congratulations! All tests completed successfully, click Close.
  13. Click Next, and then click Finish.
  14. Download the latest updates for Outlook from Microsoft. This will help prevent the most common Outlook errors Gmail users see.

Congratulations! You're done configuring your client to send and retrieve Gmail messages.

If you experience problems using POP with Outlook, please check the Common Errors or Troubleshooting tabs.

Nir

Credit: Google

Microsoft Office Outlook Connector 12.1 - Freeware

Overview

With Microsoft Office Outlook Connector, you can use Microsoft Office Outlook 2003 or Microsoft Office Outlook 2007 to access and manage your Microsoft Windows Live Hotmail or Microsoft Office Live Mail accounts, including e-mail messages, contacts and calendars for free!

Outlook Connector enables you to use your Live Hotmail accounts within Outlook:
  • Read and send your Office Live Mail/Windows Live Hotmail e-mail messages.
  • Manage your contacts in Windows Live Hotmail.
  • Use advanced options for blocking junk e-mail messages.
  • Manage multiple e-mail accounts in one place.
  • Manage, and synchronize multiple calendars, including shared calendars to Windows Live Calendar from Outlook.

Note to Premium Subscribers:If you are currently using MSN Calendar service, the Outlook Connector 12.1 will automatically migrate your calendar to the new Windows Live Calendar service. Once upgraded to Windows Live Calendar, you will be able to synchronize multiple calendars, including shared calendars to Outlook! However you will no longer be able to access MSN Calendar through Microsoft Office Outlook.

In order to make sure that all of your calendar items on the MSN Calendar service are correctly migrated to the Windows Live Calendar, you should follow these steps:
  1. With Outlook Connector 12.0 installed, synchronize your calendar in Microsoft Office Outlook with the MSN Calendar service one last time.
  2. After synchronization is complete, do not create new items on the MSN Calendar site. If you do, you will have to synchronize again using Outlook Connector 12.0 before migrating to Outlook Connector 12.1.
  3. Install Outlook Connector 12.1.
  4. Start Outlook. At this point, the Outlook Connector 12.1 will upload all of your appointments and meetings to your new Windows Live Calendar.
Download - Microsoft Download Center

Nir

Credit: microsoft.com